Error: Cabin out of Square

I recently encountered one of the most difficult challenges on Serenity Valley that I can remember in recent years. Things have been pretty ho-hum up here, at least compared to the early days, with very few challenges remaining to keep me comfortable.

So, when I discovered that my cabin had gotten out of square enough to prevent the door from closing and locking, well, it was almost fun and exciting. Well, ok, it would’ve been totally fun and exciting if it weren’t for the fact that I was trying to get out of there in time to get back to the city for a party. But with the time pressure, it was only moderately fun, and I even at one point thought to my self “Huh, I’m not sure I can solve this”, which is a thought I hardly ever encounter in life (except for when it comes to matters of the heart).
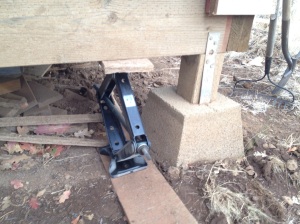
IMG_3518-0As it were, it took a few hours and multiple attempts to solve the problem. My first thought was to anchor a piece of 2×6 in the ground, then lean it against the cabin and pull on it to apply a force on the cabin. That didn’t work. I then got the jack from my car, and jacked up one corner of the cabin. I succeeded in lifting up the corner an inch (and could’ve kept going) but that didn’t seem to be making a difference so I abandoned that plan. I then tried to push the cabin using a 4×4 by jacking one end against a tree, but that ended up too unwieldy to set up alone.

IMG_3519-0Then, I got out the come-along, which hadn’t seen any action since 2009 when I used it to winch the trailer up my property. First, I drilled a 1/2-inch hole in a beam inside to tie one end of the rope, then anchored the come-along against the opposite corner on the outside, and tried to winch the cabin back into shape. This might’ve worked, except with the rope coming out the door, I couldn’t get it shut (duh). So, then, I did the same thing, but this time securing the come-along against an interior post (though, by this time, I was starting to get a bit desperate and didn’t have the presence of mind to take pictures). That didn’t seem to work.

This was around the time I felt stumped. Not to sound arrogant, but I haven’t encountered very many challenges in life where I hadn’t solved it with my 5th attempt. I thought about calling up some neighbors to help, but I wasn’t sure what they could do that I couldn’t.

As a somewhat desperate measure, I decided to try one more thing. I drilled a hole through one of my 4×4 posts, all the way through the exterior siding, so that I could tie a rope to the post from the outside. I then anchored the come-along against a large juniper tree using some rope I found. I started applying tension, then with a BANG the come-along went flying, smashing through a plastic bin that happened to be in the wrong place at the wrong time. I checked my fingers– I still had 11 of them.

After taking a deep breath and making a mental note to make sure I got more trucking rope for occasions like these, I got another length of rope, doubled it up, twisted it, then wrapped it around the hook on the come-along a few times (that’s where it failed the first time) and then around the tree. I then started cranking again, applying enough tension that it became quite difficult to pull the lever. I became paranoid so I got another rope and reinforced the anchoring using a trucker’s hitch to take some of the load off the first rope. At this point, I probably had close to a ton of tension, rendering the entire contraption into a veritable siege weapon… pointed directly at my cabin. I gave it a few more cranks, then ran over to the door to see if it would close.

It did, just barely.

IMG_3521-1.JPG

Rain Barrel!

I finally got around to setting up the rain barrel I bought last year. The wet season only lasts a couple more months, but hopefully I’ll be able to harvest some water to help keep my cherry tree watered during the dry months. In any case, I’ll tell this story with pictures, so… here we go!

Bits and pieces. Let’s hope I have everything!
20130211-211739.jpg
Putting up the gutters. I intentionally hung them low so that snow would slide off without snagging them. I may eventually put rails on the roof to keep the snow there so that I can collect more water as it melts. I’ll need to assess whether the additional load on the roof will cause problems. I also set these up on the south side so that exposure to the sun willl hopefully keep things from freezing too badly.
20130211-211750.jpg
Gutters and downspout all finished. Part way down the downspout is the RainReserve rain diverter. Instead of diverting everything, it captures water that falls along the interior sides of the downspout, while allowing bigger pieces of debris (like leaves) to fall through. Or so the theory goes…
20130211-211809.jpg
Building a platform for the rain barrel, using the only flat surface within a half-mile radius.
20130211-211821.jpg
Setting up the base. One side sits on cement blocks, while the other side sits on ice and rocks. It’s what we call MGEP (Mostly Good Enough, Probably) — the impeccable standard to which things are built on Serenity Valley. Actually, I’m not entirely confident it’ll support the weight of a full 300gal tank (2400lb). I guess we’ll find out!
20130211-211958.jpg
Ta-da!!
20130211-211844.jpg
Close-up of the rain diverter and tank hookup. The green hose is the overflow, which could also be hooked up to a second tank.
20130211-211853.jpg

Halloween in Serenity Valley

I managed to escape the city and head up to Serenity Valley for Halloween weekend, which was a real treat. Autumn is one of my favorite seasons up in the mountains, with the beautiful colors, the damp smell of the woods, and perfect 75-degree weather. And this most recent trip also turned out to be a quite productive one to boot…

On Saturday, I was walking down the dirt road to go visit my neighbor, when I stopped dead in my tracks. What did I see? Acorns! And tons of them. Now, with hundreds, maybe thousands, of Oregon White Oak on my property, you’d think it’d take more than the sight of acorns to get me excited. But, the truth is, I haven’t noticed very many acorns in the past. Sure, I’d see maybe a few worm-holed and mildewy acorns here and there, but I’d never seen shiny plump acorns littering the ground the way I saw this time.

So, I did what any sensible member of a hunter-gatherer species would do: I started gathering. I’d heard that Native Americans ate acorns, and with not much else on my property that’s edible, I was excited to finally come across a native edible crop.

As I filled my bag with these shiny orbs, giddy as a kid on Halloween, I started wondering: why haven’t I seem so many acorns in the past? And why so many acorns under this one particular tree? None of the trees neighboring this one tree by the dirt road had any significant number of acorns under them. Odd…

I stood up, stretched my back, and pulled out my iPhone to do some research. As it turns out, oak trees don’t start producing acorns until they are 20 – 50 years old. Many of the trees on my property are small and skinny, and might not be that old yet. Additionally, it could take trees 2 years or more to save up enough energy to produce acorns, and that’s assuming a late frost doesn’t destroy all the buds. Indeed, further exploration of my property confirmed that while not all of my oak trees had acorns, many of the larger ones did.

Within an hour or two of casual gathering, I had collected several pounds of acorns. But what exactly are they good for? Well, on their own, not much. I cracked open one of the acorns, and the nut inside looked juicy and inviting. Of course, a small nibble confirmed what I already knew: they’re mouth-puckering-ly bitter. I also tried roasting some on my wood stove, which made them edible, but just barely and only if I were desperate. To get rid of the bitterness, they need to be leached with water. It appears the easiest way to leach them is by first crushing them into acorn meal, then repeatedly soaking and straining them until all the bitterness is gone. You can then dry the meal over a fire or in an oven. The resulting acorn meal can be consumed as-is, or can be milled into flour and used for baking.

So, as far as edible crops go, acorns aren’t exactly the easiest to consume. But, I could see how they could be useful as a food source nonetheless, simply because of their abundance and ease in gathering, as well as their (presumably) high caloric content. They apparently don’t keep very well due to their high fat content, but I could see an autumn harvest of acorns lasting through the cold winter, and providing valuable calories during those lean months. It’s also exciting to know that if I grew some corn, I could use corn meal and acorn flour to make bread, without “importing” flour.

***

The other big news is that, my neighbor came up to help, and we (finally) got the rest of the cement board siding up! As far as I’m concerned, the exterior siding is mostly aesthetic, though it’s definitely more fire resistant than the previously exposed insulation boards, quite weatherproof, possibly somewhat insulating, and it might add a bit of rigidity to the structure, so it’s good to have them up. There’s still some parts that are exposed, so I need to cover those bits up, then put trims on the corners and around the windows, paint the whole thing, and I’ll finally be able to call it done. It’s a project that’s been 2 years (and counting) in the making, but it still feels good to make progress…

Anyway, I’ll let the pictures tell the rest of the story:

My neighbor came up to helpMeasurements for all the custom-cut panelsNow with more siding!Hut 2.1 - Now with more siding!

Journal: February 25th, 2011

I woke up to about a foot of snow this morning; I’d finally gotten that snow storm I’d been hoping for. I have a lot of things outside that I use on a regular basis, like my ice chest, the solar panels, the toilet, and everything had to be dug out before use. Oh, yeah, including toilet paper (which I leave next to the toilet in a ziplock bag). I made myself some banana pancakes for breakfast, and then decided to spend the day frolicking in the snow. Except, there was one problem. I have this nice pair of Sorel snow boots that a reader donated to me (thanks Ed!), but the snow was so deep, even just around my camp, that snow would get in from the top of the boots. Obviously, that’s what gaiters are for, except, I don’t have any. So, I decided to make some! I grabbed a couple of plastic shopping bags, cut one of the handle-loops off each bag, cut a hole in the bottom of the bags, then stuck my booted legs through the bottom holes, and stuck each foot in the remaining handle-loops (to keep the gaiters from hitching up). Then I wrapped some duct tape around the ankles and above the boots, and voila! Ghetto gaiters! I’m proud to say, despite barreling through thigh-deep snow drifts, hardly any snow got into my boots. Unfortunately, the gaiters proved to be only good for one-time use, since I had to cut through the duct tape to get them off… But, I’ve got plenty more plastic bags, if needed.

Later in the afternoon, in a bout of unusual productivity, I finished the rest of the work on the floor. The temperature is supposed to drop down to the single digits (-13C or below) tomorrow, so having an insulated floor will certainly be nice. In fact, it’s about 15F (-9C) tonight, but it’s about 65F up in the loft, and warm enough downstairs that I’m just wearing a t-shirt and a thin hoodie. I’m pretty sure that, when the floor was uninsulated, I had to keep the stove burning a lot hotter to keep the inside temperature 50F above outside temperatures, and it was certainly much colder downstairs. Now, I can even sit on the floor without freezing my butt off. Yay insulation.

A couple of readers pointed out that the way I decided to do my raised floor would be suboptimal, due to thermal bridging. This is indeed true. Those 2x4s will conduct heat out through the original floor, somewhat degrading my floor’s insulation. On the other hand, one of the reasons I decided to do what I did, was because I wanted to try using recycled cellulose insulation instead of polyisocynurate or polystyrene rigid insulation boards. Recycled cellulose, I think, is much more environmentally friendly, not just in terms of the environmental impact during production, but also when it comes time for disposal.

When it comes to houses, most people think about the cost of construction/production, as well as costs incurred while living in it (in terms of heating, air conditioning, and perhaps maintenance). But, people rarely talk about deconstruction, probably because most people expect to be out-lived by their houses, and therefore never really need to deal with the inevitable demise of their dwellings.

In my case, however, Hut 2.1 has an intended service life of 5 years, and is explicitly not designed to last long. There are a couple of reasons for such a short lifespan. First, and foremost, Hut 2.1 is as much an experiment and learning exercise as it is a home. I assumed from the beginning that it would be far from perfect, and therefore, that I would likely be building its replacement in the near future. Secondly, I consider this property itself to be an experiment. Once I’ve learned what I could learn from it, it’s conceivable that I’ll want to sell it, and buy property elsewhere. And if I were to sell this property, I may need to get rid of my structures because, let’s face it, most people don’t want tiny huts — at least, not these huts. (And since someone will inevitable suggest that perhaps I should’ve built something that other people would want, I’ll respond by saying that, building something other people would want instead of what I want defies the whole purpose of building your own home.)

So, even while designing and building my Huts, I’ve been thinking about demolition at the same time, and have concluded that using organic combustible materials as much as possible would simplify this issue. The plan, basically, is to remove any materials that can be reused (windows, for instance), and then to burn the rest. The less plastic there is, the less toxic fumes will be released during combustion. In the case of Hut 2.1, I’ll probably remove the roofing and strip off the exterior polyiso insulation before torching it, and the rest is basically just wood (including the “cellulose” insulation I just put in my floors) and a marginal quantity of unnatural materials like Tyvek and spray-foam insulation. This is also the reason I’ve avoided fiberglass; that stuff doesn’t burn and takes a long time to degrade, while I don’t want to leave behind anything that isn’t bio- (or naturally) degradable.

Journal: February 23rd, 2011

I had a pretty productive day today. It was another gorgeous clear day, and I decided to finally set up my “back-up” 45W solar panels to catch some rays while I can. Even though I could probably continue to get by on just my 100W panel, with another storm headed my way, I decided that if the weather forced me to spend more time indoors (while generally giving me less power), I might as well have a little extra capacity. I’ve seen my 100W panel output (as measured between the charge controller and battery array) as much as 80Watts, and the new 45W array was producing just shy of 40W today, so, combined, I should be able to generate as much as 120W. Though, the bigger question is how much they’d generate on a cloudy day, and that, I have yet to measure.

After I got the solar panels set up, I went and cut more firewood to shore up my stockpiles in preparation for the “arctic” temperatures predicted this weekend. I’ve been using my cordless reciprocating saw to chop dead mountain mahogany trees into short logs that’ll fit into my tiny stove. Even though there’s plenty of wood lying around, using the battery-powered saw is a suboptimal solution because it wears out the batteries, and batteries are expensive. Not too long ago, I used to be able to get a load of wood on a single charge, but the batteries are getting worn, and I’m losing power much faster now. At this rate, I’d be surprised if a set of batteries last through a single winter, and replacing batteries every year could cost about $100. It’s still cheaper than buying firewood (not to mention, firewood that’s being sold wouldn’t even fit in my tiny stove), but I’ll probably want to find an alternative if I plan on spending more winters here. An easy alternative is to get a gas-powered chainsaw, but a more environmentally friendly solution might be to use a wired saw. I could use a cordless saw to harvest long sections of branches, then chop them up back at camp where I could use a plug-in saw that’s powered by my larger battery array. Of course, using a manual saw would be the most environmentally friendly option, but I’m afraid that’s more work than I’m willing to put in, if alternatives are available.

Later in the evening, I finally got some work done on the raised floor inside Hut 2.1. One half of the floor is done, but I’ve been dragging my butt on the other half. Today, I finally mustered the motivation to work on the other half, mostly because of the predicted weather. I got as far as laying down the 2×4 joists on top of the existing floor (see photo below), but the 2x4s are a bit wet, so I’m going to let them dry out for a day or two before continuing. The next step is to fill in the gaps with insulation, then cover the whole thing with Tyvek, then the flooring goes on top of that. All in all, that’s probably just a few hours’ worth of work, so I’ll get it done fairly soon. Once the floor’s done, I’ll start working on furnishings, like a desk, a sink, and a kitchen counter to put the gas stove on. I haven’t yet decided on where to put the bathroom (there are two possible locations), but that’ll happen at some point, assuming Spring doesn’t come first. So far, I’ve just been using my outdoor composting toilet, and it’s working out fine for me. It gets a little cold sometimes, but the fresh air and nice view make up for it, if you ask me.

Update on Project 31 Preparations

A quick update on preparations for Project 31 (though, in reality, it’s hard to say what’s just part of my life and what counts as “preparation”…) I still haven’t decided on the exact start date, but I’m guessing I’ll be ready by mid-February.

Water
It’s been surprisingly dry for the past few weeks, but it’s quite possible that the weather will get wetter during Project 31. I have about 30 gallons of rain water so far, so even if there’s no precipitation, I can probably live off of that for a month if I don’t shower (I also have 55 gallons of potable water as backup). As for sanitizing collected water, I have a length of PVC pipe, along with some sand, gravel and charcoal to make a filter out of. For actual drinking water, I’ll pass the filtered water again through a Britta filter. It might not remove 100% of contaminants, but that should make the water clean enough to not kill me in 31 days.

Shelter
Progress on Hut 2.1 has been slow but steady. I finished putting up the last of the exterior rigid insulation boards last night, so practically every square inch of the walls and roof are insulated at this point. The next step is to put in the insulated raised floor, and continue with the interior “furnishings”. But I can work on that during Project 31, so I’m not in a huge rush.

Electricity
I had a bit of a scare yesterday & this morning, when I realized that the charge light on my charge controller was conspicuously off, even though the batteries had run down to 12.5 Volts. My multimeter showed an unusually low voltage across the solar panel cables, which lead me to believe that the solar panel had stopped working. After trying a few different things today, I realized that the solar panel’s voltage was fine, as long as it wasn’t hooked up to my charge controller. In other words, when it was connected to my charge controller, some kind of anomalously huge resistance was dropping the voltage to almost zero, without actually sending any of the current to my batteries (I’m guessing a short of some sort). In fewer words, my charge controller is broke. Fortunately, I had another charge controller lying around, so once I did a little rewiring, I got some juice flowing to the battery array again. The broken charge controller is still under warranty, so I should be able to send it in for a replacement, which, hopefully will arrive before I start Project 31.

This incident had me thinking that I might want a back up to my 100W solar panel, in case it did decide to break. A week or so ago, I bought a 45W solar kit from Harbor Freight because it was on sale, but I ended up returning it because it didn’t seem like I’d need the additional capacity. But it might be a good idea to have another set of panels as backup, just in case. Without a backup solar panel, my backup-backup would be to use my car battery, but that would require running the engine to keep the battery charged.

Also on the topic of electricity, I ordered a Xantrex ProSine SW600 pure sine-wave inverter, which should be arriving soon. It’s only rated for 600W, but I don’t think I even own any appliances that use anywhere near that much power. The most power hungry device I own is probably my laptop, which should pull no more than 85W.

Heating
I’ve been using the stove every night since I finished the chimney, and it’s kept me nice and warm even when it got down to 15F (-9.4C) outside. In fact, keeping the heat low enough has been the bigger challenge, especially when I’m only burning wood. It’s hard to have a small self-sustaining wood fire that doesn’t burn out in 10 minutes, yet stays hot enough to ignite and burn bigger chunks of wood. I’ve been burning a mix of charcoal and wood, and might look into making my own charcoal once I’ve burned through the bags I bought for my previous experiments. I’m also continuing to gather firewood while the weather is relatively dry, with the goal of actually stocking up on a month’s worth, so that I won’t have to worry about fuel even if it gets wet and cold during Project 31.

I’ve also tried to cook using the stove, but that’s proving to be a little harder than I’d anticipated, because the cabin gets uncomfortably warm if I get the stove hot enough to cook with. I also only have the wood stove going in the evenings, so I’d need to use propane to cook meals or heat water during the day. This isn’t a huge problem, but I might need to revise my projected propane usage up, since I might be using my propane stove for cooking more than I’d anticipated.

Communication
I was originally thinking of getting a Verizon MiFi for internet, but I’ve since decided to get a Verizon iPhone, since it has the same capability as a MiFi but would allow me to cancel my AT&T iPhone plan, and have one phone instead of the current two (I have an AT&T iPhone which doesn’t work on my property, and a Verizon feature phone on a prepaid plan for when I’m on my property). The Verizon iPhone goes on pre-order tonight, and becomes available on the 10th.

Chimney!

I finally got the chimney up a couple of days ago. After all these months of agonizing over the location and configuration of the chimney, suddenly everything fell into place. Mostly, I found the one right place to put the stove, and the rest followed from there.

Let me go back to my fancy ASCII-art to illustrate the chimney saga. Below, you’ll see the rough floor plan of my hut (imagine looking down from straight above). To the left of the vertical line is the extension (so the 2’s are in the extension), and to the right is the main section. In the main section, the line of l’s indicate where the loft is. As you can see, the loft doesn’t cover the entire main section, and there are gaps on both ends.

+----+----------------+        S
|2   |  l         l  1|        ^
|    |S l         l  L|    E --|-- W
|2   |  l         l \ |        |
+----+---------------\+        N

My original plan was to put the stove where the ‘1’ is. This was mostly a fine plan, the only issue being that the roof overhangs there by several inches, and I didn’t want to cut a hole in that. Also, once I took down the scaffolding there, it became very difficult to do any work high up on that side of the cabin, since much of the work would have to happen higher than my ladder would go. The next plan was to put the stove in the extension, marked by the two 2’s. Since the roof of the extension isn’t completely done yet, I was more willing to open up holes and such there. The problem with 2′ is that it’s close to an oak tree just outside, and to safely clear that, I would’ve needed a lot of chimney sections, which would’ve been expensive. Also, all that chimney above the roof would’ve needed some support pieces, which the store didn’t have in stock. That left 2, in the south-eastern corner as a viable option. The problem with that was that, the stove would take up a large portion of the extension, which seemed like a waste of space. Also, it didn’t seem like an effective place for the stove, since the heat would rise, hit the low extension roof, before making its way to the main section of the cabin.

At the end, I put the stove where the ‘S’ is, in a pretty central location. This turned out to be the optimal solution in all ways. First, it leaves the extension completely open for use (I’m planning on putting the bathroom, sink and kitchen in there). Secondly, it’s a more central location, and the heat would spread more evenly. Since the loft isn’t covering that spot, I could have a nice long stove pipe extending above the loft level, for better heat exchange. Lastly, unlike the other side (where ‘1’ is), the extension roof provided a decent platform from which to do the external work. The last decision was on which chimney support kit to use: a wall-support kit (which goes out the wall and up), or a cathedral kit (which goes straight up through the roof). At the end, I chose the wall-support, which was more expensive, but had all the parts I needed (the cathedral kit didn’t come with the flashing, which seemed like a rather important piece).

All in all, the work took about 3 afternoons, going at my usual leisurely pace. The first day, I got the stove pipe sections together — all 9ft of them. It took a while to figure out how to assemble them, but after the first two, the rest went pretty easily. The next day, I cut a hole in the gables, and attached the outside portion of the thimble. Cutting the hole was the scariest part, since I had to make sure everything lined up properly. While a chimney that goes straight up through the roof only needs to align in 2 dimensions (the height being adjustable later), I had to make sure the hole lined up with the end of the stovepipe elbow in 3 dimensions, the height being particularly important since the stovepipes have a set height, and it’s difficult to adjust (i.e. I’d have to either cut the stovepipe, or move the stove itself up or down). Fortunately, the alignment worked out perfectly (seen above) to my huge relief. The rest of the work happened on the 3rd afternoon, and as you can see in the video below, the last piece went up right around dusk…

As I climbed up onto the ridge of my roof to attach the final piece of my chimney, the rain cap, I couldn’t help but feel as if I’d reached the summit of a mountain, after a long arduous climb. Indeed, protruding 3ft above my ridge, the rain cap is the highest point of my cabin, which also makes it the highest man-made item on my property. But, beyond the mere physical sense of height, this was, in many ways, a crowning achievement, literally as the rain cap closely resembles a crown, but also because completing the chimney represented the final step in my conquest over the last remaining challenge.

Though I bought this property with no particular plan in mind, it wasn’t long before I found myself engulfed in the challenges of making this little patch of wilderness habitable. Food, water, shelter. The basics weren’t too hard, at first. Then came the necessities of a more civilized life: sewage, electricity, and communications. I found solutions for each. The last basic need, heating, had however eluded me. Until today. But now I have that too, and I am ready to declare my part of the woods habitable, through all weathers, and all seasons.

Of course, there’s plenty more work to do on Hut 2.1, and in general, but I feel like most of the more challenging problems are behind me. At the very least, as I head into Project 31, I know that my major needs will be met: food, water, warmth. I’ll come out alive. The rest is a matter of comfort, and that’s a trivial luxury compared to the other challenges.

Quick update: January 22, 2011

Quick update: Finished insulating north-side, mostly covered up the south-side. Installed new window on the east-face (seen above). Wired up the new batteries, for a total capacity of 335Ah (of which probably half is usable). Tried out the new propane refill “kit”, which worked great once I read the directions and realized I was supposed to open the valve after flipping it upside down (duh). Played with fire some more. The idea has promise, but perhaps not this time around. I’ll be using the stove after all, and should have the chimney up by the next time I update.

All in all, life’s been great. The weather continues to be sunny and warm, but that only makes me worried that next month (when I’ll be holed up for Project 31) might end up being extra cold and snowy… But then, Hut 2.1 is coming along, slowly but surely. I’m not terribly worried.

Insulating Hut 2.1

I posted some thoughts on insulation a while back, but now that I’m actually in the process of insulating Hut 2.1, I figured I’d do another post talking about what I’ve ended up doing.

As you can see in the photo above, I’m using R-5 3/4″ thick polyisocyanurate rigid foam insulation boards on the exterior. If you recall, I used that stuff on the roof as well, so basically the whole structure, save for the windows, door, and floor, will be encased in those boards. Normally, insulation goes inside the wall cavities, but I first thought of putting insulation on the outside while working on Hut 1.0, and implemented the idea in Hut 2.0. The reasons for doing so are manyfold:

  1. Putting insulation on the outside leaves the wall cavities available for use. I’ve filled in some of the walls with “shelves”, but I also have the option of filling them in with batt insulation if the rigid boards on the outside prove to be insufficient. The same applies for the space between my rafters, which I may fill with batt insulation later.
  2. Instead of using a traditional air barrier, I’m taping the seams between the insulation panels together so that the insulation panels themselves form an air barrier. The boards on the roof also act as a waterproof layer, in the event that moisture leaks through the roofing panels. This cuts down on building materials, which lowers the financial cost as well as the total environmental footprint.
  3. By wrapping the entire structure in insulation, I am increasing the thermal mass within the thermal envelope. That is, all the posts and beams and OSB sheathing inside the insulation act as a thermal mass, which can absorb heat and release it slowly. Obviously, wood isn’t as effective of a thermal mass as, say, a concrete slab, but I think it counts for something. The downside is that, if I’m heating the structure from a dead cold, it takes longer to warm up, because, for a while, the structure itself is going to be absorbing some of that heat.
  4. Covering every square inch of the exterior in insulation (again, except for windows and doors) prevents thermal bridging. Thermal bridging, in the context of structures, is when heat conducts through structural members, bypassing insulation. For instance, in a traditional 2×4 stud wall construction, only the space between studs typically have insulation, so the studs themselves can conduct heat in or out. While that may not seem like much, if studs are spaced 16″ apart, that’s 1.5″ out of every 16″, or close to 10% of the surface area that’s left uninsulated.

When I first thought of the idea, I thought it was all new and radical, but I’ve since learned that this exterior insulation thing is… well, a thing. For instance, a related and somewhat similar concept is SIP –or Structured Insulated Panel— construction, which is a fancy way to say “insulation boards sandwiched between structural sheathing.” The one interesting thing about SIP is that the insulation boards are glued to the sheathing, thus increasing rigidity and eliminating any gaps. Gaps in insulation are bad, because it could allow for air circulation, which can render insulation moot by carrying heat in or out. For Hut 2.1, I originally tried using a spray-on glue to attach the polyiso boards to the underlying OSB sheathing, but the glue I got didn’t stick too well. So, instead, I’ve been nailing the boards onto the sheathing, and, where possible, through to the 4×4 posts (the gray patches of duct tape in the photo above are where I’ve put in nails). That doesn’t eliminate the gaps, but, in my case, I’m not terribly concerned because those gaps will be inside the thermal envelope, and as I mentioned above, the foam boards should, in theory, form a mostly air-tight enclosure and relatively little of that heat should escape outside.

For the floor, I’m thinking of doing something different as well. Normally, batt insulation would be stuffed in the spaces between the floor joists. But, I don’t like fiberglass, and ever since I saw those cubes of recycled cellulose blow-in insulation at the hardware store (pictured below), I’ve been wanting to use them. The stuff is made of recycled materials, supposedly uses far less energy to manufacture than traditional alternatives, and is pretty cheap ($8 per bag), so it sounds pretty awesome all around. The current plan is to lay down more 2×4 “joists” on top of the existing floor (though running perpendicularly to the existing joists for strength), then put another layer of OSB on top of that, and fill in the 3.5″ tall gaps with the blow-in insulation, which should give me about R-13. Since the insulation will be sandwiched between two layers of OSB, I also won’t have to worry (as much) about critters getting in there or stealing my insulation, which I hear are concerns for the more typical exposed under-the-floor batt insulation.

So, that’s basically the plan so far. I’m considering getting some batt insulation that’s made of recycled materials, similar to the blow-in insulation I got, to stuff in between my rafters. But, I think I’ll hold off on that until I get my stove going, and see how well the existing insulation works (or doesn’t work).